
Need to back up data to a remote, SSH-enabled server? Try Back In Time.
Back In Time is one of the more flexible and user-friendly GUI back-up tools for Linux. It includes more than enough features to satisfy nearly anyone needing to back up user data. Included in that feature set is the ability to back up to a remote server via SSH.
By backing up over SSH, you can be sure that the transfer of your data is securely wrapped within an encrypted channel, so chances of anyone sniffing out your data are less likely than they would be if you were transferring via the likes of the FTP protocol.

What you need
You need a few things to make this happen:
- A user account with sudo privileges (to install Back In Time).
- A server running the SSH daemon accepting connections.
- Some data to back up.
That’s it. Let’s get to work.
Installing Back In Time
The first thing to do is install Back In Time. In order to do this, you must add the necessary repository. Open a terminal window and issue the following command:
sudo add-apt-repository ppa:bit-team/stable
Once the repository is added, install Back In Time with the following two commands:
sudo apt-get update
sudo apt-get install backintime-qt4
With the app installed, you should find the launcher in your desktop menu. Open Back In Time and get ready to set up your first remote backup.
Creating an SSH key
In order to successfully use Back In Time for SSH, you need to create an encryption key and send it to the remote server. Here’s how:
- Create the key by issuing the command ssh —keygen.
- Copy the newly created key to server with the command ssh-copy-id USER@SERVER_IP (Where USER is the remote username and SERVER_IP is the IP address of the remote server).
Creating the remote backup
From the Back In Time profile editor (Figure A), select SSH from the Mode dropdown.
Fill out the necessary information for the remote host, adding a path to house the backup. From the Cipher dropdown, make sure default is selected and that your Private Key is set (it should set by default). If the Private Key option doesn’t set, most likely it will be /home/USER/.ssh/id_rsa(where USER is your local username).
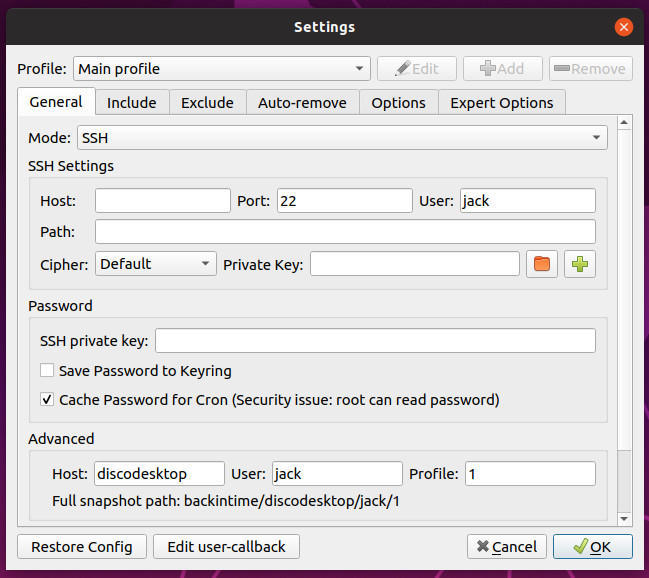
Type your SSH authentication key password into the SSH Private key text area (not your local or remote user password).
In the Include tab (Figure B) click either Add file or Add folder to include data to be backed up.
Add as many files and/or folders as needed for your backup. Finally, scroll down and make sure to select the schedule option you want (from every minute to weekly to custom). Once you take care of that, click OK to save your settings to the default profile and dismiss the window. If Back In Time doesn’t reappear, open it from your desktop menu and then click the Take Snapshot button (farthest button to the left on the toolbar — Figure C).
Congratulations, your Back In Time snapshot instance is now setup to automatically (and regularly … if you scheduled it as such) back up to a remote server, via SSH. Enjoy the assurance that your data is now safe, should disaster strike.